New: seeMote Cube for visionOS Developers - Build physical input for Apple Vision Pro apps. Learn More ›
ESP32 Socket Server: Connecting from a Putty socket Client
Introduction
In this tutorial, we will check how to setup a socket server on the ESP32 and how to contact it using Putty as a socket client. The code will be implemented on the Arduino core for the ESP32.
Note that we have already covered in greater detail how to set up a socket server on the ESP32 on this previous post. Nonetheless, we had to implement a Python socket client to reach the server and thus test the code.
Although Python is a very easy to use language, using Putty is even easier and doesn’t need any kind of programming to implement the client, allowing us to focus on the ESP32 code.
Among st many other features, Putty allows us to establish a raw socket connection to a server, making it a very useful tool for testing. Putty is a free and open source tool and you can download it here.
The tests were performed using a DFRobot’s ESP32 module integrated in a ESP32 development board.
The code
To get started, we need to include the WiFi.h library, so we can connect the ESP32 to a Wireless network. We will also need to store the network credentials (network name and password), so we can connect to it.
#include "WiFi.h"

const char* ssid = "yourNetworkName";
const char* password = "yourNetworkPassword";
In order to setup the server, we will need an object of class WiFiServer, which we will store in a global variable so we can use it on the Arduino setup and loop functions.
As we have seen in previous posts, the constructor of this class receives the port where the server will be listening. I will be using port 80, but you can test with other values.
WiFiServer wifiServer(80);
Moving on to the setup function, we will start by opening a serial connection so we can later output the results of our program. Followed by that, we will connect the ESP32 to the WiFi network to which we have previously declared the credentials.
At the end of the setup function and after the WiFi connection procedure is finished, we will call the begin method on our WiFiServer object so the server starts listening to incoming socket clients.
You can check the full setup function code below, which already includes the mentioned connection to the WiFi network and the call to the begin method to start the socket server.
void setup() {

  Serial.begin(115200);

  delay(1000);

  WiFi.begin(ssid, password);

  while (WiFi.status() != WL_CONNECTED) {
    delay(1000);
    Serial.println("Connecting to WiFi..");
  }

  Serial.println("Connected to the WiFi network");
  Serial.println(WiFi.localIP());

  wifiServer.begin();
}
We will handle the connection of clients and the reception of data on the Arduino main loop function.
The first thing we need to do is calling the available method on our WiFiServer object. This method takes no arguments and returns as output an object of class WiFiClient.
Note that by default this is a non-blocking method, which means it will return an instance of the WiFiClient class even if there is no client connected.
Thus, we need to check if the client is indeed connected, either by calling the connected method on the returned object and checking its value or directly using the returned object on a IF condition. This second option is only possible because the WiFiClient class overrides the C++ bool operator to return the same value as the connected method.
WiFiClient client = wifiServer.available();

if (client) {
  // Code for handling the client
}
Inside the IF block we need to handle the reception of data sent from the client. Nonetheless, we will only try to get data while the client is connected and we need to detect when the client is no longer detected. So, we will do a inner loop that will keep running only while the client is connected.
To check if the client is connected, we simply need to call the connected method on the WiFiClient object, as already mentioned before. The return of this function can be used as the stopping condition of the while loop.
while (client.connected()) {
// Data received handling code
}
Now, inside that loop, to check if the client sent data, we call the available method on the WiFiClient object.
This method takes no arguments and returns as output the number of bytes available for reading. This is also a non-blocking method which will return 0 if there is no data to read.
So we need to check if the returned value is greater than zero and if it is, we can get a byte by calling the read method on the WiFiClient object. Note that since the client may send more that 1 byte at each time, we can optimize this polling by doing a loop and keep reading bytes while the available method returns an output greater than 0.
We will print each byte read to the serial port, so we can confirm that the data sent by the client is reaching the ESP32.
When there are no more bytes to read, we do a small delay and we go back to the beginning of the outer loop to check for more data.
while (client.connected()) {

    while (client.available()>0) {
      char c = client.read();
      Serial.write(c);
   }

   delay(10);
}
Once we detect that the client has disconnected, then we no longer try to read more bytes and we simply call the stop method on the WiFiClient object, in order to free all the resources from that connection.
The final source code can be seen below.
#include "WiFi.h"

const char* ssid = "yourNetworkName";
const char* password =  "yourNetworkPassword";

WiFiServer wifiServer(80);

void setup() {

  Serial.begin(115200);

  delay(1000);

  WiFi.begin(ssid, password);

  while (WiFi.status() != WL_CONNECTED) {
    delay(1000);
    Serial.println("Connecting to WiFi..");
  }

  Serial.println("Connected to the WiFi network");
  Serial.println(WiFi.localIP());

  wifiServer.begin();
}

void loop() {

  WiFiClient client = wifiServer.available();

  if (client) {

    while (client.connected()) {

      while (client.available()>0) {
        char c = client.read();
        Serial.write(c);
      }

      delay(10);
    }

    client.stop();
    Serial.println("Client disconnected");

  }
}
Testing the code
To test the code, we first need to compile it and upload it to the ESP32 using the Arduino IDE. Once the procedure finishes, simply open the IDE serial monitor.
As shown in figure 1, it should print the IP assigned to the ESP32 as soon as the connection to the WiFi network finishes. Copy that IP, since we are going to need to use it on Putty.
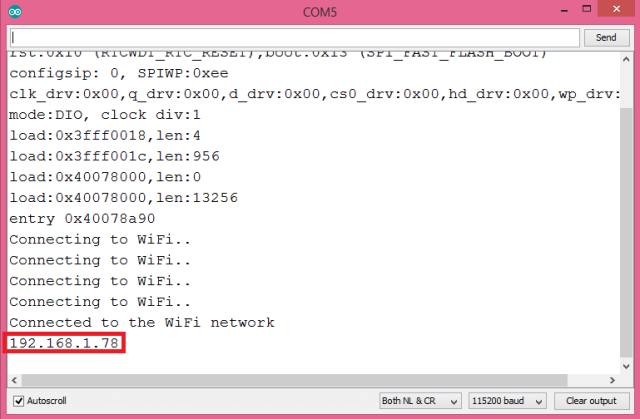
Figure 1 – IP address assigned to the ESP32 on the WiFi network.
Next, after downloading Putty, simply open it. You should get a window similar to the one shown in figure 2. As highlighted, you should set the connection type as “Raw” and then, on the “Host Name (or IP address)” text input, you should put the IP copied from the serial monitor.
On the “Port” text input you should put the value 80, which was the number of the port we defined for our server to be listening on. Once all the configurations are done, click on the “Open” button.

Figure 2 – Configuring Putty as a socket client.
After that a command line should appear. There, you can type content and send it to the ESP32. If you go back to the Arduino IDE serial monitor, the content sent with Putty should get printed, as shown in figure 3.

Figure 3 – Printing the content sent from Putty.
If you close the Putty command window, then the socket connection should be stopped and the event detected in the ESP32, as shown in figure 4.
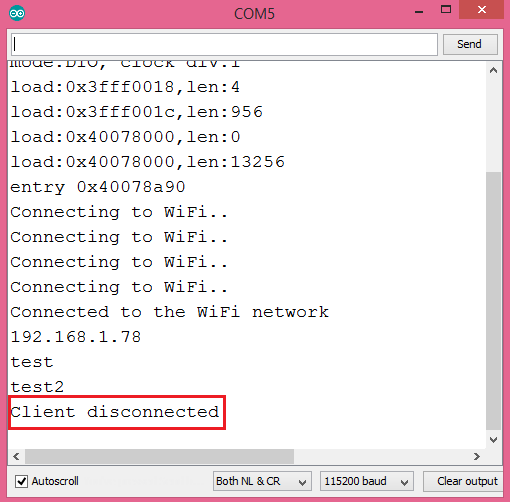
Figure 4 – Socket client disconnected.

Compare six 4K USB cameras using IMX415, IMX274, and IMX678 sensors across resolution, color, field of view, distortion, Linux, and low-light tests.
REVIEWS
This article is an engineering test note, mainly intended to demonstrate the actual performance of the module in common development scenarios, rather than a laboratory calibration report.
REVIEWS
Visit DFRobot at FAB26 Boston for hands-on AI workshops, open-source hardware demos, and practical insights into K–12 maker education.
NEWS