New: seeMote Cube for visionOS Developers - Build physical input for Apple Vision Pro apps. Learn More ›
ESP32 Tutorial Arduino: 28. websocket server - receiving binary frames
Introduction
In this tutorial we will check how to receive binary frames from a websocket client in a server hosted by the ESP32.
In the ESP32, we will be using the HTTP async web server libraries. For an introduction on how to use websockets with these libraries, please check this previous tutorial.
As testing client, we will develop a very simple Python websocket client. For an explanation on the module needed to install an how to get started sending binary content with Python, please consult this post.
The tests were performed using a DFRobot’s ESP32 module integrated in a ESP32 development board.
The ESP32 Arduino code
As usual, the first thing we are going to do is including the libraries we need. For this example, we will need the WiFi.h library, to connect the ESP32 to a WiFi network, and the ESPAsyncWebServer.h, so setup the HTTP async web server and to setup the websocket endpoint.
#include "WiFi.h"
#include "ESPAsyncWebServer.h"
In order to be able to connect the ESP32 to the WiFi network, we will need its credentials, which we will store as global variables.
const char* ssid = "yourNetworkName";
const char* password = "yourNetworkPassword";
After this, we will need an object of class AsyncWebServer, which we will use to configure the HTTP web server.
AsyncWebServer server(80);
To finalize the global variables declaration, we will need an object of class AsyncWebSocket, which will be used to setup the websocket endpoint and to bind it to a handling function.
As input of the constructor of this class we need to pass a string with the websocket endpoint, which we will call “/test“. Later, we need to use this endpoint in the Python code when establishing the connection to the ESP32 websocket endpoint.
AsyncWebSocket ws("/test");
The setup function will be very simple. First, we will open a serial connection, to output the results of our program, and then we will connect the ESP32 to the WiFi network, printing the IP assigned to it at the end of the procedure.
Serial.begin(115200);

WiFi.begin(ssid, password);

while (WiFi.status() != WL_CONNECTED) {
  delay(1000);
  Serial.println("Connecting to WiFi..");
}

Serial.println(WiFi.localIP());
Followed by that, we will bind our websocket endpoint to an handling function which we will call onWsEvent. We will check the implementation of this function later.
Finally, we register the AsyncWebSocket in our HTTP web server. This procedure is done by calling the addHandler method on the AsyncWebServer object, passing as argument the address of the AsyncWebSocket object.
ws.onEvent(onWsEvent);
server.addHandler(&ws);
After doing this, we still need to call the begin method on the AsyncWebServer object, so it starts listening to incoming requests. The full setup function, already including this method call, can be seen below.
void setup(){
  Serial.begin(115200);

  WiFi.begin(ssid, password);

  while (WiFi.status() != WL_CONNECTED) {
    delay(1000);
    Serial.println("Connecting to WiFi..");
  }

  Serial.println(WiFi.localIP());

  ws.onEvent(onWsEvent);
  server.addHandler(&ws);

  server.begin();
}
Now we will take care of writing the websocket handling function. Note that, as already covered here, this handling function will be executed automatically by the HTTP web server framework when a websocket related event happens.
As also covered in the mentioned post, the signature of our handling function needs to follow what is defined in the AwsEventHandler type. This signature has as third parameter an enumerated value, which corresponds to the websocket event type.
You can check the full function signature below.
void onWsEvent(AsyncWebSocket * server, AsyncWebSocketClient * client, AwsEventType type, void * arg, uint8_t *data, size_t len){
  // Implementation
}
The easiest way of handling the multiple events that can occur is with a sequence of if else statements. So, we are going to focus on the data received event, which corresponds to the enumerated value WS_EVT_DATA.
if(type == WS_EVT_DATA){
  // Handling of received data
}
If the mentioned event happens, it means we have received data from a websocket client that has previously connected to the server. For simplicity, we will assume that clients will only send binary data.
So, when the event occurs, we will simply iterate through all the bytes received and print them to the serial port, in a loop. To do so, we need to use the fifth and sixth arguments of the handling function, which correspond to the array with the received data and to the length of the array, respectively.
Note that the array of data is passed to the handling function as an array of bytes and, since we are expecting binary content, we don’t need to do any type cast and we can directly print those values to the serial port.
for(int i=0; i < len; i++) {
  Serial.print(data[i]);
  Serial.print("|");
}
The full handling function can be seen below. Note that we have added the handling of the client connected and disconnected events, which prints an informative message to the serial port, in order to make debugging easier.
void onWsEvent(AsyncWebSocket * server, AsyncWebSocketClient * client, AwsEventType type, void * arg, uint8_t *data, size_t len){

  if(type == WS_EVT_CONNECT){

    Serial.println("Websocket client connection received");

  } else if(type == WS_EVT_DISCONNECT){
    Serial.println("Client disconnected");

  } else if(type == WS_EVT_DATA){

    Serial.println("Data received: ");

    for(int i=0; i < len; i++) {
      Serial.print(data[i]);
      Serial.print("|");
    }

    Serial.println();
  }
}
The final Arduino code can be seen below.
#include "WiFi.h"
#include "ESPAsyncWebServer.h"

const char* ssid = "yourNetworkName";
const char* password =  "yourNetworkPassword";

AsyncWebServer server(80);
AsyncWebSocket ws("/test");

void onWsEvent(AsyncWebSocket * server, AsyncWebSocketClient * client, AwsEventType type, void * arg, uint8_t *data, size_t len){

  if(type == WS_EVT_CONNECT){

    Serial.println("Websocket client connection received");

  } else if(type == WS_EVT_DISCONNECT){
    Serial.println("Client disconnected");

  } else if(type == WS_EVT_DATA){

    Serial.println("Data received: ");

    for(int i=0; i < len; i++) {
      Serial.print(data[i]);
      Serial.print("|");
    }

    Serial.println();
  }
}

void setup(){
  Serial.begin(115200);

  WiFi.begin(ssid, password);

  while (WiFi.status() != WL_CONNECTED) {
    delay(1000);
    Serial.println("Connecting to WiFi..");
  }

  Serial.println(WiFi.localIP());

  ws.onEvent(onWsEvent);
  server.addHandler(&ws);

  server.begin();
}

void loop(){}
The Python code
The Python code for creating a websocket client that sends some binary data to a server will be very simple and short, as we will see below.
The first thing we need to do is importing the websocket module, so we can have access to the class we will need to send the data.
import websocket
After this is done, we need to instantiate an object of class WebSocket, which is defined on the module we have just imported. We will use this object to both connect to the server and send the data in a binary frame.
ws = websocket.WebSocket()
After we have instantiated an object of the mentioned class, we need to connect to the ESP32 websocket server. We do this by calling the connect method and passing as input a string with the websocket endpoint, in the following format:
ws://#yourEspIp#/test
In my case, using the IP assigned to my ESP32, the Python method call should be like the one indicated below. In your case, you should use the IP address that is printed to the serial port after your ESP32 finishes establishing the connection to the WiFi network.
ws.connect("ws://192.168.1.78/test")
After the connection is established, we can send the binary frame by simply calling the send_binary method on the WebSocket object. As input, we will pass an array with the values of the bytes we want to send to the ESP32.
We are going to send some arbitrary bytes, which should later be received and printed by the ESP32.
ws.send_binary([100, 220, 130])
To finalize, we should close the connection to the server by calling the close method on our WebSocket object, thus freeing the resources.
ws.close()
The final Python code can be seen below.
import websocket

ws = websocket.WebSocket()
ws.connect("ws://192.168.1.78/test")

ws.send_binary([100, 220, 130])

ws.close()
Testing the code
To test the whole system, first compile and upload the code to your ESP32 device. Once the procedure is done, open the Arduino IDE serial monitor and copy the IP address that is printed after the device successfully connects to the WiFi network. You should use that IP address on your Python code.
After putting the IP address of the ESP32 on the websocket endpoint in the Python code, simply run the script in a tool of your choice (ex: the command line or a Python IDE, such as IDLE).
When the code finishes the execution, go back to your Arduino IDE serial monitor. You should have an output similar to figure 1, which shows the bytes we have sent from the Python client.
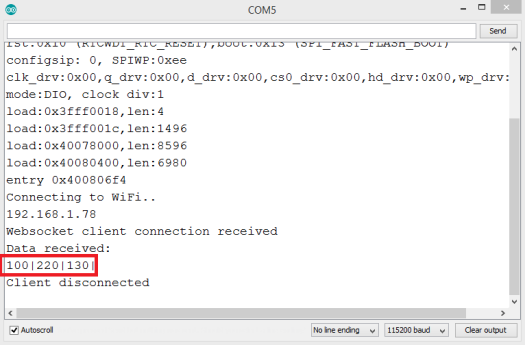
Figure 1 – Binary content printed to the Arduino IDE serial monitor.
Related Posts
Python websocket client: sending binary content
ESP32 Arduino web server: Receiving data from JavaScript websocket client
ESP32 Arduino web server: Sending data to JavaScript client via websocket

Compare six 4K USB cameras using IMX415, IMX274, and IMX678 sensors across resolution, color, field of view, distortion, Linux, and low-light tests.
REVIEWS
This article is an engineering test note, mainly intended to demonstrate the actual performance of the module in common development scenarios, rather than a laboratory calibration report.
REVIEWS
Visit DFRobot at FAB26 Boston for hands-on AI workshops, open-source hardware demos, and practical insights into K–12 maker education.
NEWS